
Why You’ll Love This Baked Alaska
If you have ever wanted a dessert that feels a little dramatic but still approachable at home, this Baked Alaska is a fun one to make. It has the cozy flavor of a brownie dessert, the chill of an ice cream dessert, and that gorgeous toasted meringue on top that makes everyone stop and stare. I love serving it when I want something special without spending all day in the kitchen.
- Easy to make ahead: The brownie base, ice cream layer, and meringue can all be prepped in stages, which helps on busy days.
- Great for gatherings: This ice cream cake style dessert slices beautifully and always gets people talking at birthday dinners, holidays, or dinner parties.
- Flexible for different tastes: You can use almost any ice cream flavor you like, which makes it easy to match the season or the crowd.
- Bold flavor and texture: You get a rich brownie base, creamy frozen center, and light meringue dessert topping in every bite.
For readers who like simple dessert ideas with a wow factor, this brownie baked Alaska recipe brings the fun without needing advanced skills. If you enjoy other sweet bakes like homemade cinnamon bread or want another party-friendly treat, this one fits right in. It is festive, playful, and surprisingly doable for home bakers.
This is the kind of dessert that looks fancy on the table, but the steps are very manageable when you break them down.
Jump to:
- Why You’ll Love This Baked Alaska
- Essential Ingredients for Baked Alaska
- Main Ingredients
- Ingredient Notes That Help
- Special Dietary Options
- How to Prepare the Perfect Baked Alaska: Step-by-Step Guide
- First Step: Bake the brownie base
- Second Step: Shape the ice cream layer
- Third Step: Add the ice cream to the brownie
- Fourth Step: Whip the meringue
- Fifth Step: Cover the dessert completely
- Sixth Step: Freeze before baking
- Seventh Step: Brown the meringue
- Final Step: Slice and serve right away
- Protein and Main Component Alternatives
- Brownie Base Swaps
- Ice Cream Flavor Swaps
- Vegetable, Sauce, and Seasoning Modifications
- Sauce and Topping Ideas
- Seasoning and Flavor Add-Ins
- Mastering Baked Alaska: Advanced Tips and Variations
- Pro cooking techniques
- Flavor variations
- Presentation tips
- Make-ahead options
- How to Store Baked Alaska: Best Practices
- Refrigeration
- Freezing
- Reheating
- Meal prep considerations
- FAQs: Frequently Asked Questions About Baked Alaska
- What is Baked Alaska?
- How do you make Baked Alaska at home?
- Why doesn’t the ice cream melt in Baked Alaska?
- What are tips for perfect Baked Alaska?
- Can you flambé Baked Alaska safely?
- Baked Alaska
- Ingredients
- Instructions
- Last Step:
- Notes
- Nutrition
- Did you make this recipe?
Essential Ingredients for Baked Alaska
Here is everything you need for this homemade Baked Alaska. I like to keep the ingredient list simple so the dessert stays approachable and the flavors really shine.
Main Ingredients
- Two 1.5-quart containers of any flavor ice cream – This creates the frozen center and lets you choose a flavor that matches your mood.
- Enough brownie batter for a 9-inch pan – The brownie base adds deep chocolate flavor and a sturdy foundation for the dessert.
- 4 large egg whites, at room temperature – These whip into the airy meringue that insulates the ice cream.
- 1 cup granulated sugar – Sweetens the meringue and helps it become glossy and stable.
- 1/2 teaspoon cream of tartar – Supports the egg whites so they hold their shape better.
- 1/2 teaspoon pure vanilla extract – Adds warmth and a soft bakery-style flavor to the meringue.
Ingredient Notes That Help
| Ingredient | Why It Matters | Best Tip |
|---|---|---|
| Ice cream | Forms the cold center | Choose a flavor you love, since it is the star of each slice |
| Brownie batter | Acts as the base | Bake it in a 9-inch pan so the shape fits the dessert well |
| Egg whites | Create the meringue | Room-temperature whites whip faster and reach more volume |
| Sugar | Sweetens and stabilizes | Add it slowly for a smoother meringue |
| Cream of tartar | Helps stabilize foam | Do not skip it if you want peaks that hold |
Special Dietary Options
- Vegan: Use a plant-based brownie batter and dairy-free ice cream. Replace the meringue with an aquafaba meringue made from chickpea liquid, sugar, and vanilla.
- Gluten-free: Bake the brownie base with a gluten-free brownie mix or your favorite gluten-free homemade brownie recipe.
- Low-calorie: Use lighter ice cream and a smaller brownie layer, then keep slices modest for a more balanced treat.
For more dessert inspiration, you might also enjoy browsing the sweet treats at apple oat muffins if you like comforting homemade bakes.
How to Prepare the Perfect Baked Alaska: Step-by-Step Guide
This baked Alaska recipe is easiest when you work in stages. The trick is to keep everything cold, move quickly when assembling, and make sure the meringue fully seals the ice cream so no heat sneaks in during baking.
First Step: Bake the brownie base
Prepare enough brownie batter for a 9-inch pan, then bake it according to your recipe or mix directions. Let it cool completely before moving on. A warm base can soften the ice cream too soon, so patience helps here.
Second Step: Shape the ice cream layer
Let your two 1.5-quart containers of ice cream soften just enough to be moldable, but not melty. Scoop or pack the ice cream into a dome or thick layer that fits the brownie base. If needed, use plastic wrap to help shape it neatly. Place the shaped ice cream on a parchment-lined tray and freeze until firm, usually 2 to 4 hours.
Third Step: Add the ice cream to the brownie
Set the frozen ice cream layer on top of the cooled brownie base. Work fast here so it stays solid. Press lightly so the layers stick together, then return the dessert to the freezer while you make the meringue.
Fourth Step: Whip the meringue
In a clean bowl, beat the 4 egg whites with 1/2 teaspoon cream of tartar until foamy. Slowly add the 1 cup granulated sugar, a little at a time, while beating. Keep going until the mixture forms stiff, glossy peaks. Beat in the 1/2 teaspoon pure vanilla extract at the end.
Clean bowl, room-temperature whites, and slow sugar addition are the three biggest keys to a strong meringue.
Fifth Step: Cover the dessert completely
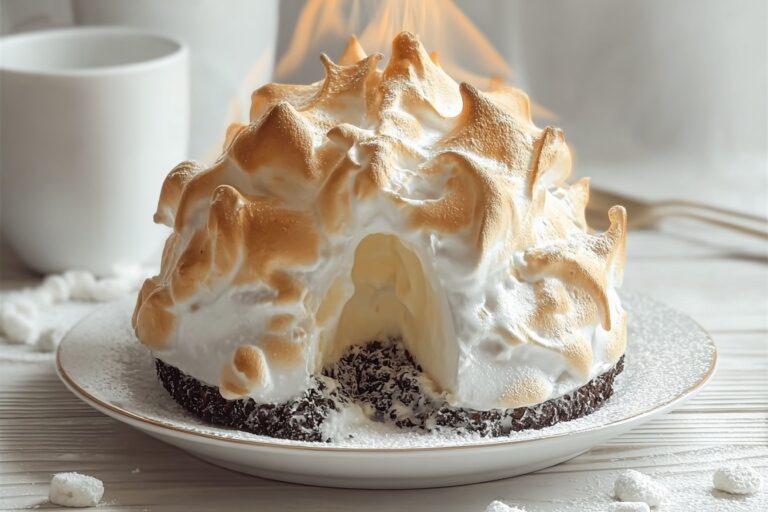
Remove the frozen cake from the freezer and spread or pipe the meringue over every bit of the ice cream, sealing the edges down to the brownie base. This is the most important part of a successful homemade Baked Alaska because the meringue acts like a protective blanket.
Sixth Step: Freeze before baking
Freeze the fully assembled dessert for at least 2 hours, or overnight if you are planning ahead. The colder the dessert, the better it will hold up in the oven.
Seventh Step: Brown the meringue
Preheat your oven to 475°F to 500°F. Set the Baked Alaska on a sturdy sheet pan and bake for 3 to 5 minutes, just until the meringue turns golden brown. Watch it closely. Every oven behaves a little differently, and this step happens fast.
Final Step: Slice and serve right away
Take it out of the oven and serve immediately with a hot knife for clean slices. The inside should still be cold, creamy, and a little dramatic when the spoon or knife cuts through the layers. If you want a little extra flair, you can add a quick torch finish instead of baking, or even try a safe flambé if you are comfortable with that style of presentation.
Protein and Main Component Alternatives
Brownie Base Swaps
If you do not want to use brownies, the base of this ice cream dessert can change easily. A thick layer of pound cake, sponge cake, or even chocolate loaf cake works well. The goal is to create a firm foundation that can support the frozen center without crumbling too much when sliced.
For a lighter feel, use a thinner cake layer. For a richer brownie baked Alaska, keep the chocolate base dense and fudgy. If you like simple bakes that pair well with dessert menus, you may also enjoy whole grain peanut butter banana bread muffins for another homemade treat idea.
Ice Cream Flavor Swaps
Almost any flavor works, which is part of the charm of a Baked Alaska. Vanilla is classic, but chocolate chip, strawberry, coffee, mint, butter pecan, or cookies and cream all bring something different to the table. If you are serving kids, bright flavors tend to be the biggest hit. For adults, coffee or caramel often feels a little more polished.
Avoid overly soft or very mix-in-heavy ice creams if you want a smoother dome. A dense, freezer-friendly ice cream usually gives the neatest finish.
Vegetable, Sauce, and Seasoning Modifications
Sauce and Topping Ideas
While this dessert does not use vegetables in the usual sense, toppings and sauces can change the final flavor in easy ways. A drizzle of chocolate sauce over the plated slices makes the brownie base taste even richer. Raspberry sauce adds a tart contrast that cuts through the sweetness. Caramel sauce works beautifully if you are using vanilla or butter pecan ice cream.
You can also serve the dessert plain and let the meringue do the talking. That is often the best route when you want the classic look and flavor. For a party, set out toppings on the side so guests can customize each slice.
Seasoning and Flavor Add-Ins
To change the meringue slightly, keep the vanilla extract and add a tiny pinch of cinnamon or nutmeg if the rest of the dessert flavor can handle it. You can also top the finished dessert with shaved chocolate, crushed cookies, or toasted nuts for extra crunch. These small changes help you make the recipe feel fresh for different seasons.
When you want another easy sweet recipe for your kitchen rotation, a dessert like this pairs nicely with a simple baking day and a warm drink on the side.
Mastering Baked Alaska: Advanced Tips and Variations
Pro cooking techniques
Success with Baked Alaska mostly comes down to temperature control. Keep the brownie base fully cool, freeze the ice cream solid, and do not rush the meringue stage. If your kitchen is warm, chill the serving plate too. A cold plate helps the dessert stay firm a little longer once it comes out of the oven.
Pipe the meringue with a star tip if you want pretty ridges that brown well. Those peaks look beautiful and make the dessert feel bakery-style. If you prefer a smoother finish, spread the meringue with an offset spatula and then make a few swirls on top for texture.
Flavor variations
The brownie baked Alaska recipe can change with the season. Try peppermint ice cream during the holidays, strawberry in spring, or coffee ice cream for a grown-up dinner party version. You can also use a boxed brownie mix to save time on busy weeknights. That is one reason this easy baked Alaska works so well for home cooks who want something special without too much stress.
Presentation tips
Serve each slice on a chilled plate and spoon a little extra sauce beside it, not over it. This keeps the meringue looking tall and pretty. A few berries, shaved chocolate, or a mint leaf can make the plate feel complete without hiding the dessert itself.
Make-ahead options
You can bake the brownie layer and shape the ice cream a day ahead. In fact, the dessert often works better when it has plenty of freezer time. Assemble the whole thing earlier in the day, then bake it just before serving. That way you spend less time in the kitchen when guests arrive.
For the best texture, think cold, colder, coldest until the very last bake.
How to Store Baked Alaska: Best Practices
Refrigeration
Baked Alaska is best eaten right after baking, so refrigeration is not ideal for the finished dessert. If you have leftovers, move them to the fridge only for a short time if needed before serving again. The meringue will soften quickly, and the ice cream layer will lose its shape.
Freezing
Unbaked assembled Baked Alaska freezes well. Wrap it carefully in plastic wrap and then foil before storing it in the freezer. It can hold for about 1 to 2 days before baking, and sometimes longer if tightly wrapped, though the texture is best when used sooner rather than later. If you want neat slices later, freeze it on a flat tray first so the shape stays steady.
Reheating
This dessert does not need traditional reheating. Instead, you simply bake or torch the meringue right before serving. If leftover slices are already baked, do not try to warm them in the oven because the ice cream will melt too much.
Meal prep considerations
For parties or busy schedules, make the brownie and ice cream layers ahead, then keep them frozen until the event. Whip the meringue fresh for the best texture. If you like planning desserts ahead of time, this method makes the whole process much easier.

FAQs: Frequently Asked Questions About Baked Alaska
What is Baked Alaska?
Baked Alaska is a striking dessert with three main layers: a base of sponge cake or brownie, a block of ice cream in the center, and a thick layer of soft, marshmallow-like meringue on top. The meringue, piped into peaks and swirls, fully seals the ice cream to protect it during baking. The whole dessert goes into a very hot oven (around 500°F) for just 3-5 minutes, or under a kitchen torch, until the meringue turns golden brown. Surprisingly, the ice cream stays frozen thanks to the meringue’s insulating air pockets. Once sliced, the ice cream softens slightly and drips into the cake base for a creamy contrast. It’s often served flambéed with liqueur for extra drama, but skip the flame if you’re new to it. This showstopper serves 8-10 and wows at parties. (98 words)
How do you make Baked Alaska at home?
Start with a 9-inch cake base, like pound cake or brownie, baked and cooled. Soften a 1/2-gallon rectangular ice cream block (vanilla or Neapolitan works best), mold it onto the cake, and refreeze for 2 hours. Whip 6 egg whites with 1/4 teaspoon cream of tartar and 3/4 cup sugar to stiff peaks for meringue. Spread it thickly over the ice cream, sealing edges completely—no gaps. Freeze assembled dessert 4 hours or overnight. Bake at 475°F for 4 minutes until browned, or torch for control. Slice with a hot knife. Prep takes 45 minutes plus freezing; total time 6+ hours. Use a sheet pan for stability. Pro tip: Room-temp meringue pipes easier. (112 words)
Why doesn’t the ice cream melt in Baked Alaska?
The meringue acts as a perfect insulator during the quick bake. Its whipped egg whites trap millions of tiny air bubbles, which slow heat transfer to the ice cream below. High oven temps (450-500°F) toast the outside fast—in under 5 minutes—before heat penetrates deeply. The cake base absorbs any minor warmth. Science backs it: meringue’s low thermal conductivity (like foam) keeps the core below freezing. Tests show ice cream at -10°F stays solid post-bake. For best results, freeze everything solid first and minimize bake time. If flambéing, the brief flame adds flair without melting. This trick dates back to the 1800s. (104 words)
What are tips for perfect Baked Alaska?
Freeze the ice cream mold firmly to hold shape—wrap in plastic for 4+ hours. Use Italian meringue (with hot sugar syrup) for stability if Swiss seems too soft. Pipe meringue with a star tip for peaks that brown evenly. Preheat oven fully to 500°F and place on lowest rack for bottom heat. Torch option: Start low, circle outward to avoid burning sugar. Test doneness by gentle tapping—crisp outside, soft inside. Common fix: Soggy meringue? Dry egg whites first. Serve immediately on chilled plates. Scale for minis using muffin tins. Avoid chocolate ice cream; it darkens too much. Yields pro results with practice. (109 words)
Can you flambé Baked Alaska safely?
Yes, flambé adds a fiery tableside show: Pour 1/4 cup warmed high-proof rum or brandy (80+ proof) over the browned meringue, then ignite with a long lighter. The alcohol burns off quickly (10-20 seconds), leaving caramel notes without melting ice cream—meringue shields it. Safety first: Do it in a fire-safe dish away from flammables, have a lid ready to smother flames, and never in an oven mitt. Practice sans dessert. Skip if kids are around. Alternatives: Liqueur drizzle post-slice. Famous at delis like Delmonico’s since 1967. Pairs with coffee. Always warn guests. (96 words)
Baked Alaska
🍦 Delight in the dramatic contrast of frozen ice cream over fudgy brownie, crowned with torched meringue for a showstopping, crowd-pleasing dessert!
🍫 This decadent treat combines creamy cold centers with warm, crisp toppings – easy to assemble yet impressively elegant for any celebration.
- Total Time: 5 hours 10 minutes
- Yield: 8 servings
Ingredients
– Two 1.5-quart containers of any flavor ice cream for the frozen center
– Enough brownie batter for a 9-inch pan for the base
– 4 large egg whites, at room temperature for the meringue
– 1 cup granulated sugar for sweetening the meringue
– 1/2 teaspoon cream of tartar for stabilizing the egg whites
– 1/2 teaspoon pure vanilla extract for flavoring the meringue
Instructions
1-First Step: Bake the brownie base Prepare enough brownie batter for a 9-inch pan, then bake it according to your recipe or mix directions. Let it cool completely before moving on. A warm base can soften the ice cream too soon, so patience helps here.
2-Second Step: Shape the ice cream layer Let your two 1.5-quart containers of ice cream soften just enough to be moldable, but not melty. Scoop or pack the ice cream into a dome or thick layer that fits the brownie base. If needed, use plastic wrap to help shape it neatly. Place the shaped ice cream on a parchment-lined tray and freeze until firm, usually 2 to 4 hours.
3-Third Step: Add the ice cream to the brownie Set the frozen ice cream layer on top of the cooled brownie base. Work fast here so it stays solid. Press lightly so the layers stick together, then return the dessert to the freezer while you make the meringue.
4-Fourth Step: Whip the meringue In a clean bowl, beat the 4 egg whites with 1/2 teaspoon cream of tartar until foamy. Slowly add the 1 cup granulated sugar, a little at a time, while beating. Keep going until the mixture forms stiff, glossy peaks. Beat in the 1/2 teaspoon pure vanilla extract at the end.
5-Fifth Step: Cover the dessert completely Remove the frozen cake from the freezer and spread or pipe the meringue over every bit of the ice cream, sealing the edges down to the brownie base. This is the most important part of a successful homemade Baked Alaska because the meringue acts like a protective blanket.
6-Sixth Step: Freeze before baking Freeze the fully assembled dessert for at least 2 hours, or overnight if you are planning ahead. The colder the dessert, the better it will hold up in the oven.
7-Seventh Step: Brown the meringue Preheat your oven to 475°F to 500°F. Set the Baked Alaska on a sturdy sheet pan and bake for 3 to 5 minutes, just until the meringue turns golden brown. Watch it closely. Every oven behaves a little differently, and this step happens fast.
8-Final Step: Slice and serve right away Take it out of the oven and serve immediately with a hot knife for clean slices. The inside should still be cold, creamy, and a little dramatic when the spoon or knife cuts through the layers. If you want a little extra flair, you can add a quick torch finish instead of baking, or even try a safe flambé if you are comfortable with that style of presentation.
Last Step:
Please leave a rating and comment letting us know how you liked this recipe! This helps our business to thrive and continue providing free, high-quality recipes for you.Notes
🧊 Freeze the ice cream dome solidly overnight for best shape retention during torching.
🔥 A kitchen torch gives precise control; broil only if monitoring constantly to avoid melting.
🍫 Use high-quality ice cream and fudgy brownie for maximum flavor contrast and indulgence.
- Prep Time: 45 minutes
- Freeze: 4 hours
- Cook Time: 25 minutes
- Category: Desserts
- Method: Oven
- Cuisine: American
- Diet: Vegetarian
Nutrition
- Serving Size: 1 slice
- Calories: 500 kcal
- Sugar: 55g
- Sodium: 200mg
- Fat: 28g
- Saturated Fat: 15g
- Unsaturated Fat: 12g
- Trans Fat: 0g
- Carbohydrates: 65g
- Fiber: 2g
- Protein: 6g
- Cholesterol: 150mg