
Why You’ll Love This Strawberry Shortcake
Strawberry Shortcake is one of those desserts that feels special without asking for much in return. It brings together tender biscuits, juicy strawberries, and soft whipped cream in a way that is simple, comforting, and just plain good. If you are baking for family, friends, or a weekend treat at home, this recipe gives you a dessert that looks impressive and tastes even better.
- Easy to make: The steps are beginner friendly, and the total time is about 1 hour, so you can fit it into a busy day.
- Fresh and satisfying: Strawberries add natural sweetness and a bright flavor that feels light after a meal.
- Flexible for different needs: You can swap buttermilk, adjust the berries, or make parts ahead for easier serving.
- Classic flavor: The mix of buttery biscuits, vanilla whipped cream, and juicy strawberries creates a dessert that never gets old.
Ease of preparation
This dessert keeps things simple. The strawberries need a short rest with sugar, the biscuits come together with basic pantry ingredients, and the whipped cream takes only a few minutes to beat. Because the recipe uses straightforward steps, it works well for new bakers and for anyone who wants a homemade dessert without a lot of stress.
Health benefits
Strawberries bring vitamin C, fiber, and a fresh fruit serving to the plate. According to WebMD’s guide to strawberry benefits, strawberries are a smart choice when you want something sweet with some nutritional value too. The dessert still feels like a treat, but the fruit gives it a fresher, lighter finish than many other sweets.
Versatility
This Strawberry Shortcake recipe works for family dinners, birthday tables, potlucks, and spring gatherings. You can also adjust it for what you have on hand. A few blueberries make it more colorful, and a different milk option can help if you do not have buttermilk.
Distinctive flavor
What makes this dessert stand out is the texture. The biscuits are soft inside with crisp edges, the berries get juicy after sitting with sugar, and the whipped cream adds a cool, creamy finish. It is a simple combination, but it hits all the right notes.
Let the strawberries sit with sugar for a bit before serving. That one small step gives you sweeter berries and a syrupy sauce that soaks beautifully into the biscuits.
Jump to:
- Why You’ll Love This Strawberry Shortcake
- Ease of preparation
- Health benefits
- Versatility
- Distinctive flavor
- Essential Ingredients for Strawberry Shortcake
- For the strawberries and whipped cream
- For the biscuits
- What each ingredient does
- Special dietary options
- How to Prepare the Perfect Strawberry Shortcake: Step-by-Step Guide
- First Step: Prepare the strawberries
- Second Step: Preheat the oven and get your pan ready
- Third Step: Mix the dry ingredients
- Fourth Step: Cut in the butter
- Fifth Step: Add the buttermilk
- Sixth Step: Shape the biscuit dough
- Seventh Step: Cut and arrange the biscuits
- Eighth Step: Brush, sprinkle, and bake
- Ninth Step: Make the whipped cream
- Tenth Step: Assemble and serve
- Dietary Substitutions to Customize Your Strawberry Shortcake
- Protein and Main Component Alternatives
- Vegetable, Sauce, and Seasoning Modifications
- Mastering Strawberry Shortcake: Advanced Tips and Variations
- Pro cooking techniques
- Flavor variations
- Presentation tips
- Make-ahead options
- How to Store Strawberry Shortcake: Best Practices
- Refrigeration
- Freezing
- Reheating
- Meal prep considerations
- FAQs: Frequently Asked Questions About Strawberry Shortcake
- Strawberry Shortcake
- Ingredients
- Instructions
- Last Step:
- Notes
- Nutrition
- Did you make this recipe?
Essential Ingredients for Strawberry Shortcake
Below is a full ingredient list with the exact amounts you need. The recipe is split into the fruit and cream mixture, plus the biscuit base.
For the strawberries and whipped cream
- 6 to 7 cups quartered strawberries
- 1/4 cup granulated sugar, divided
- 2 tablespoons granulated sugar
- 1 teaspoon pure vanilla extract
- 1 cup heavy cream
For the biscuits
- 2 and 3/4 cups all-purpose flour
- 1/4 cup granulated sugar
- 4 teaspoons aluminum-free baking powder
- 1/2 teaspoon baking soda
- 1 teaspoon salt
- 3/4 cup unsalted butter, cold and cubed
- 1 cup cold buttermilk
- 2 tablespoons heavy cream or buttermilk
- Coarse sugar for sprinkling
What each ingredient does
| Ingredient | Purpose |
|---|---|
| Strawberries | Bring fresh sweetness and juicy texture |
| Sugar | Draws out berry juices and sweetens the cream and biscuits |
| Vanilla extract | Adds warmth and depth to the whipped cream |
| Heavy cream | Makes the topping rich and fluffy |
| Flour | Builds the biscuit structure |
| Baking powder and baking soda | Help the biscuits rise |
| Cold butter | Creates flaky layers |
| Buttermilk | Adds tang and keeps the dough tender |
Special dietary options
- Vegan: Use plant-based butter, coconut cream or a dairy-free whipping cream, and a non-dairy milk with a little lemon juice in place of buttermilk.
- Gluten-free: Use a 1 to 1 gluten-free flour blend that includes xanthan gum.
- Low-calorie: Reduce the sugar a little, use a lighter whipped topping, and keep the berry filling generous.
How to Prepare the Perfect Strawberry Shortcake: Step-by-Step Guide
This recipe takes about 30 minutes of prep time, 15 minutes of cook time, and about 1 hour total. It serves 10 to 12 people, so it is a great choice for gatherings.
First Step: Prepare the strawberries
Start by washing, hulling, and quartering 6 to 7 cups of strawberries. Place them in a bowl with 1/4 cup granulated sugar and stir well. Let them sit in the refrigerator while you make the biscuits. This gives the berries time to release their juices, which creates a sweet sauce for layering later.
Second Step: Preheat the oven and get your pan ready
Set your oven to 400 degrees Fahrenheit. Line a baking sheet with parchment paper, or use a large skillet if you want the biscuits to bake close together. Keeping the biscuits touching helps them rise up and stay soft on the sides.
Third Step: Mix the dry ingredients
In a large bowl, whisk together 2 and 3/4 cups all-purpose flour, 1/4 cup granulated sugar, 4 teaspoons aluminum-free baking powder, 1/2 teaspoon baking soda, and 1 teaspoon salt. Mixing the dry ingredients first spreads the leavening evenly through the dough, which helps the biscuits bake up light and tall.
Fourth Step: Cut in the butter
Add 3/4 cup cold and cubed unsalted butter to the flour mixture. Use a pastry cutter, fork, or your fingertips to cut the butter in until the mixture looks like coarse crumbs with some pea-sized pieces left. Those butter bits melt in the oven and create flaky layers. Cold butter matters here, so try not to let it soften too much.
Fifth Step: Add the buttermilk
Pour in 1 cup cold buttermilk and gently fold the dough together. The dough should look a little rough, and that is okay. Mix only until it starts to come together. Overmixing can make the biscuits tough instead of soft.
Sixth Step: Shape the biscuit dough
Turn the dough onto a lightly floured surface. Pat it into a rectangle, then fold it over itself a few times. Flatten and fold several times to build layers, then gently pat it to about 1-inch thickness. This step helps the biscuits bake with a tender center and light, flaky edges.
Seventh Step: Cut and arrange the biscuits
Use a biscuit cutter or round cutter to cut the dough into circles. Press straight down without twisting, since twisting can seal the edges and reduce the rise. Arrange the biscuits touching in a skillet or place them close together on the baking sheet. They can even kiss each other a little on the pan, which gives softer sides and a nice pull-apart texture.
Eighth Step: Brush, sprinkle, and bake
Brush the tops with 2 tablespoons heavy cream or buttermilk. Sprinkle on coarse sugar for a sweet, sparkling finish. Bake for 18 to 22 minutes, or until the tops are golden brown and the biscuits are cooked through. If you like a little more color, keep them in for the full time, but watch closely near the end.
Ninth Step: Make the whipped cream
While the biscuits cool slightly, beat 1 cup heavy cream with the remaining 2 tablespoons granulated sugar and 1 teaspoon pure vanilla extract. Mix until soft peaks form. The whipped cream should be fluffy and smooth, not stiff and grainy. Stop as soon as the cream holds gentle peaks.
Tenth Step: Assemble and serve
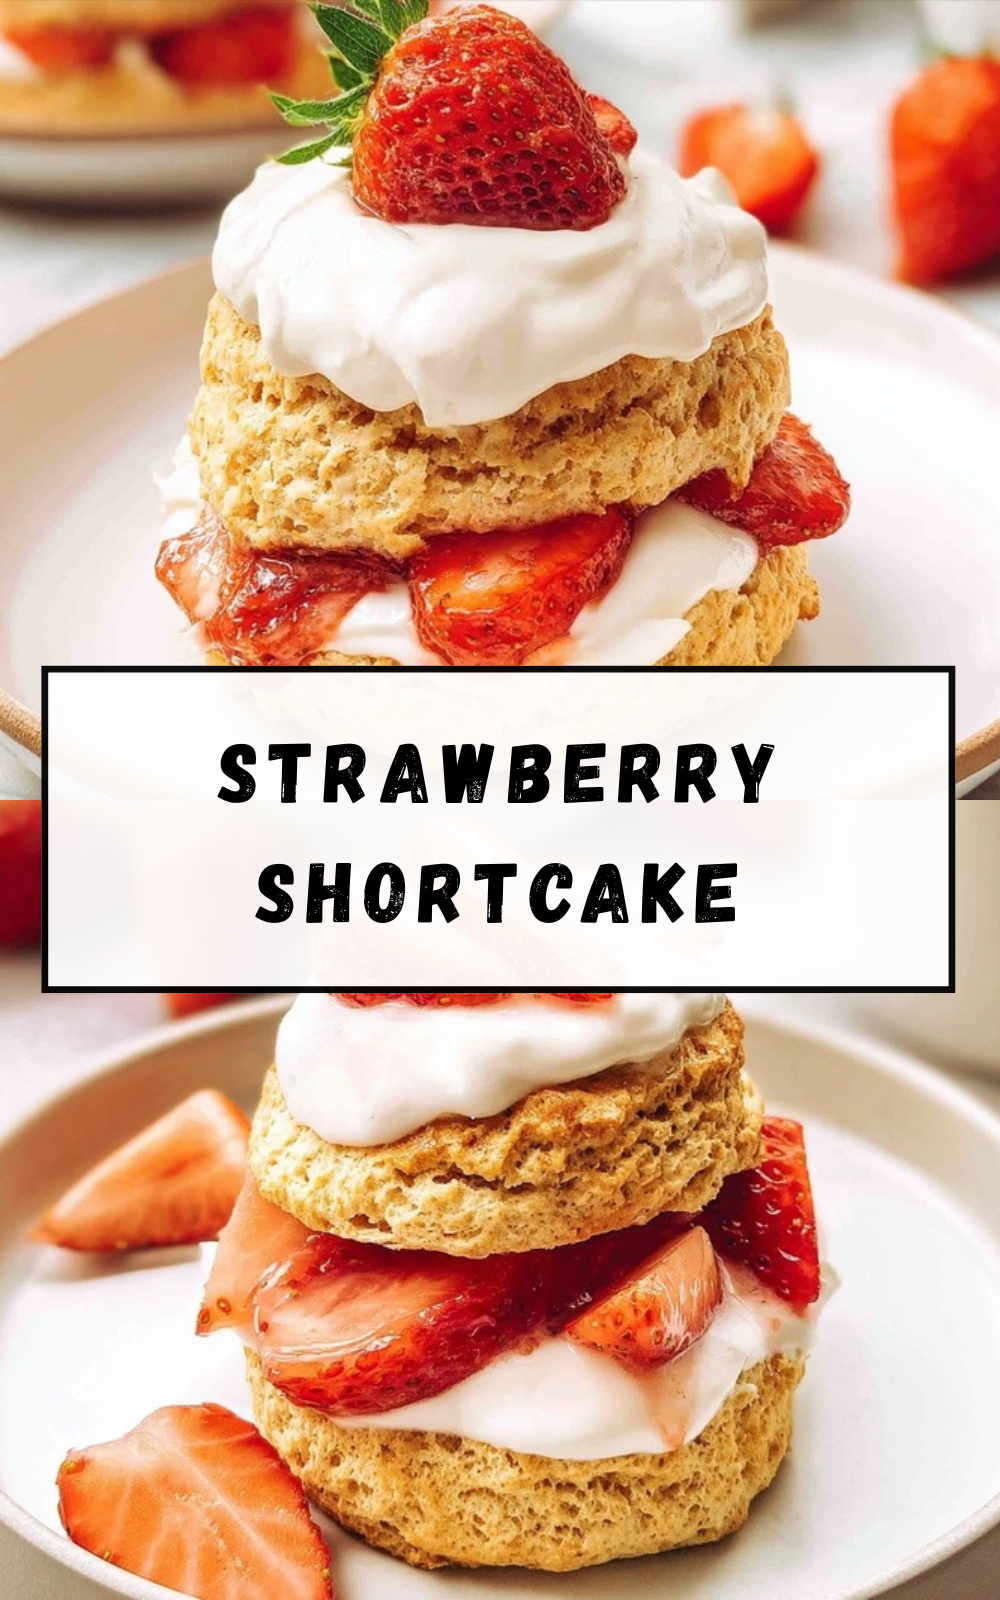
Split each biscuit in half with a serrated knife. Spoon strawberries and their juices over the bottom half, add a generous dollop of whipped cream, then top with the biscuit lid or serve open-faced. Finish with a few extra berries and a little cream on top if you want a bakery-style look.
For the best texture, assemble Strawberry Shortcake just before serving. That keeps the biscuits from getting too soft while still letting the juices soak in a little.

Dietary Substitutions to Customize Your Strawberry Shortcake
Protein and Main Component Alternatives
Even though this dessert does not rely on a main protein, you can still make useful swaps based on your needs. If you are out of buttermilk, use whole milk with a small splash of lemon juice or vinegar. The biscuit dough will still bake up nicely. For a dairy-free version, use plant-based butter and a whipping cream alternative made for desserts. If you want a lighter finish, use a lower-fat whipped topping, but beat it gently so it does not get watery.
Vegetable, Sauce, and Seasoning Modifications
The fruit filling is easy to adjust. Add blueberries for a patriotic look, or mix in sliced peaches during summer for a soft, sweet twist. A pinch of lemon zest in the berries can brighten the flavor, while a little almond extract in the cream gives a bakery-style taste. If you like less sweetness, reduce the sugar in the berries slightly and let the fruit speak for itself. For readers who enjoy more dessert ideas, try a cozy breakfast bake like this cinnamon bread recipe or a sweet brunch treat such as blueberry banana muffins.
Mastering Strawberry Shortcake: Advanced Tips and Variations
Pro cooking techniques
For the flakiest biscuits, keep the butter cold from start to finish. If the dough starts to feel warm, chill it for 10 minutes before cutting. Also, avoid twisting the cutter when shaping the biscuits. That simple habit helps them rise evenly. Another useful trick is to fold the dough a few extra times. Those layers make the finished biscuits feel more bakery-like.
Flavor variations
You can keep the classic flavor or make small changes that fit the season. Try adding blueberries for a red, white, and blue dessert. A little lemon zest in the whipped cream gives a bright finish, and a splash of almond extract can add a gentle nutty note. For guests who like richer sweets, serve the shortcake with a side of almond croissant bites on a brunch board.
Presentation tips
For a pretty plate, split the biscuit and stack the layers slightly off center. Spoon some strawberry juices around the plate, add a tall swirl of whipped cream, and finish with a few berries on top. If you are serving a crowd, set out the biscuits, berries, and cream separately so everyone can build their own. That works well for parties and family events.
Make-ahead options
The biscuits can be made ahead and stored at room temperature for up to 3 days, or frozen for up to 3 months. The strawberries can be mixed with sugar earlier in the day and chilled until serving time. You can also whip the cream a little ahead, then re-whisk it briefly before assembling. That makes this dessert much easier when you are hosting or juggling a busy schedule.
How to Store Strawberry Shortcake: Best Practices
Proper storage helps keep each part of the dessert tasting fresh. Since the biscuits, strawberries, and whipped cream all behave differently, it is best to store them separately whenever possible.
Refrigeration
Store leftover strawberries and whipped cream in separate covered containers in the refrigerator. The biscuits can stay at room temperature for a short time, but if they are already assembled, place the leftovers in the fridge and eat them within 1 day for the best texture.
Freezing
Freeze baked biscuits once they have cooled completely. Wrap them well and place them in a freezer-safe bag or container. They keep for up to 3 months. The strawberries and whipped cream do not freeze as well once assembled, so it is better to freeze only the biscuits.
Reheating
Warm the biscuits in a low oven for a few minutes until they are just heated through. Avoid overheating, since that can dry them out. Let frozen biscuits thaw at room temperature before warming them. Assemble the shortcake after reheating so the fruit stays fresh.
Meal prep considerations
If you are making this for a party, bake the biscuits a day or two ahead and prepare the berries the morning of serving. Whip the cream shortly before dessert time for the fluffiest texture. This keeps the process easy and gives you a fresh-tasting dessert with less last-minute work.
FAQs: Frequently Asked Questions About Strawberry Shortcake
Print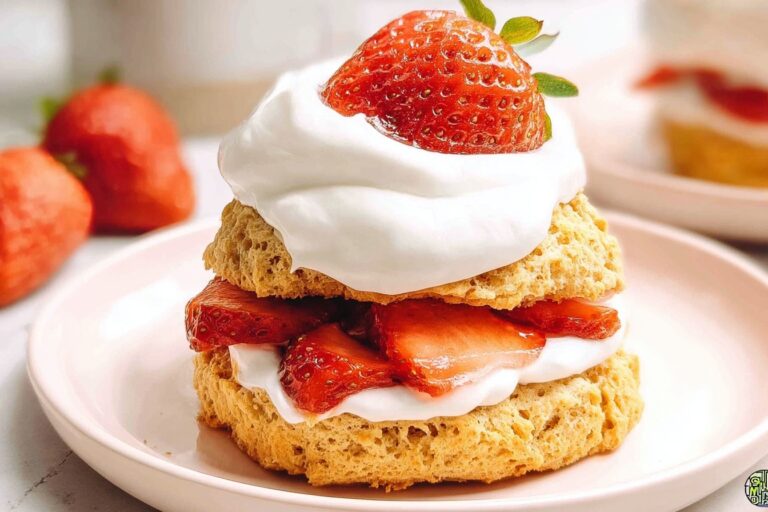
Strawberry Shortcake
🍓 Dive into tender, flaky biscuits piled high with macerated strawberries and billowy whipped cream for pure summer bliss.
🧁 This homemade classic is fresher, flakier, and more delicious than any store-bought version—ideal for picnics and parties!
- Total Time: 1 hour
- Yield: 10-12 servings
Ingredients
– 6 to 7 cups quartered strawberries
– 1/4 cup granulated sugar, divided
– 2 tablespoons granulated sugar
– 1 teaspoon pure vanilla extract
– 1 cup heavy cream
– 2 and 3/4 cups all-purpose flour
– 1/4 cup granulated sugar
– 4 teaspoons aluminum-free baking powder
– 1/2 teaspoon baking soda
– 1 teaspoon salt
– 3/4 cup unsalted butter, cold and cubed
– 1 cup cold buttermilk
– 2 tablespoons heavy cream or buttermilk
– Coarse sugar for sprinkling
Instructions
1-First Step: Prepare the strawberries Start by washing, hulling, and quartering 6 to 7 cups of strawberries. Place them in a bowl with 1/4 cup granulated sugar and stir well. Let them sit in the refrigerator while you make the biscuits. This gives the berries time to release their juices, which creates a sweet sauce for layering later.
2-Second Step: Preheat the oven and get your pan ready Set your oven to 400 degrees Fahrenheit. Line a baking sheet with parchment paper, or use a large skillet if you want the biscuits to bake close together. Keeping the biscuits touching helps them rise up and stay soft on the sides.
3-Third Step: Mix the dry ingredients In a large bowl, whisk together 2 and 3/4 cups all-purpose flour, 1/4 cup granulated sugar, 4 teaspoons aluminum-free baking powder, 1/2 teaspoon baking soda, and 1 teaspoon salt. Mixing the dry ingredients first spreads the leavening evenly through the dough, which helps the biscuits bake up light and tall.
4-Fourth Step: Cut in the butter Add 3/4 cup cold and cubed unsalted butter to the flour mixture. Use a pastry cutter, fork, or your fingertips to cut the butter in until the mixture looks like coarse crumbs with some pea-sized pieces left. Those butter bits melt in the oven and create flaky layers. Cold butter matters here, so try not to let it soften too much.
5-Fifth Step: Add the buttermilk Pour in 1 cup cold buttermilk and gently fold the dough together. The dough should look a little rough, and that is okay. Mix only until it starts to come together. Overmixing can make the biscuits tough instead of soft.
6-Sixth Step: Shape the biscuit dough Turn the dough onto a lightly floured surface. Pat it into a rectangle, then fold it over itself a few times. Flatten and fold several times to build layers, then gently pat it to about 1-inch thickness. This step helps the biscuits bake with a tender center and light, flaky edges.
7-Seventh Step: Cut and arrange the biscuits Use a biscuit cutter or round cutter to cut the dough into circles. Press straight down without twisting, since twisting can seal the edges and reduce the rise. Arrange the biscuits touching in a skillet or place them close together on the baking sheet. They can even kiss each other a little on the pan, which gives softer sides and a nice pull-apart texture.
8-Eighth Step: Brush, sprinkle, and bake Brush the tops with 2 tablespoons heavy cream or buttermilk. Sprinkle on coarse sugar for a sweet, sparkling finish. Bake for 18 to 22 minutes, or until the tops are golden brown and the biscuits are cooked through. If you like a little more color, keep them in for the full time, but watch closely near the end.
9-Ninth Step: Make the whipped cream While the biscuits cool slightly, beat 1 cup heavy cream with the remaining 2 tablespoons granulated sugar and 1 teaspoon pure vanilla extract. Mix until soft peaks form. The whipped cream should be fluffy and smooth, not stiff and grainy. Stop as soon as the cream holds gentle peaks.
10-Tenth Step: Assemble and serve Split each biscuit in half with a serrated knife. Spoon strawberries and their juices over the bottom half, add a generous dollop of whipped cream, then top with the biscuit lid or serve open-faced. Finish with a few extra berries and a little cream on top if you want a bakery-style look.
Last Step:
Please leave a rating and comment letting us know how you liked this recipe! This helps our business to thrive and continue providing free, high-quality recipes for you.Notes
🧈 Keep butter and buttermilk ice-cold for the flakiest, tallest biscuits.
🍓 Macerate strawberries ahead to maximize juicy sweetness and flavor.
🥄 Gently fold the biscuit dough multiple times without overworking for perfect layers.
- Prep Time: 30 minutes
- Chilling Time: 30 minutes
- Cook Time: 20 minutes
- Category: Dessert
- Method: Baking
- Cuisine: American
- Diet: Vegetarian
Nutrition
- Serving Size: 1 shortcake
- Calories: 450 kcal
- Sugar: 30g
- Sodium: 450mg
- Fat: 22g
- Saturated Fat: 13g
- Trans Fat: 0g
- Carbohydrates: 60g
- Fiber: 3g
- Protein: 7g
- Cholesterol: 65mg