Ingredients
– 1 and 3/4 pounds cream cheese bars for creating the creamy base
– 1 cup granulated sugar for sweetening and helping browning
– 4 large eggs for setting the custard structure
– 1 and 2/3 cups heavy cream for adding silkiness
– 1 teaspoon vanilla extract for optional flavor note
– 1/4 teaspoon salt for balancing flavor
– 1/4 cup all-purpose flour for helping the cheesecake hold shape
Instructions
1-First Step: Prepare the pan and oven. Start by preheating your oven to 400 degrees Fahrenheit. This high heat is important because it gives the cheesecake its deep brown top and lightly scorched edges. Lightly butter a 9×5-inch loaf pan, then line it with parchment paper, leaving some overhang so you can lift the cheesecake out later. The butter helps the parchment stick to the sides, which makes assembly easier. If your loaf pan fills close to the top, place it on a baking sheet before it goes into the oven. That extra step helps catch any overflow and gives you a little peace of mind while it bakes. This is a good move for anyone using a smaller or deeper pan.
2-Second Step: Beat the cream cheese and sugar. Add the softened cream cheese and granulated sugar to a large bowl. Using a hand mixer, beat them together for about 5 minutes until the mixture looks smooth and creamy. Take your time here, because this is where a lot of the final texture comes from. If the cream cheese is still lumpy, the cheesecake can bake unevenly. This is also the stage where room temperature cream cheese matters most. Full-fat cream cheese bars blend more smoothly than spreadable versions, and they also give the dessert a richer finish.
3-Third Step: Add the eggs one at a time. Crack in the eggs one by one, mixing well after each addition. This helps the batter stay smooth and prevents the mixture from separating. Each egg should disappear fully before the next goes in. A steady pace here helps the cheesecake bake with a creamy center instead of a scrambled texture. If you like a more classic Basque cheesecake structure, do not rush this step. Mixing after each egg gives the batter a glossy look and makes the final result more reliable.
4-Fourth Step: Stir in the cream, vanilla, and salt. Pour in the heavy cream, then add the vanilla extract if you are using it, and finish with the salt. Whisk until everything comes together. The batter will loosen and become smooth again. This is exactly what you want, because the heavy cream is what gives the cheesecake its soft, custard-like bite. Vanilla is optional, so if you do not have it, the cheesecake will still taste wonderful. The salted note is subtle, but it keeps the dessert from tasting too sweet.
5-Fifth Step: Add the flour gently. Sift in the all-purpose flour gradually, then stir gently to incorporate it. Sifting helps prevent lumps, and adding it slowly keeps the batter light. Do not overmix once the flour is in. Overworking the batter can make the cheesecake firmer than intended. Sift the flour slowly and stir with a light hand. That small bit of patience helps keep the final texture silky instead of heavy.
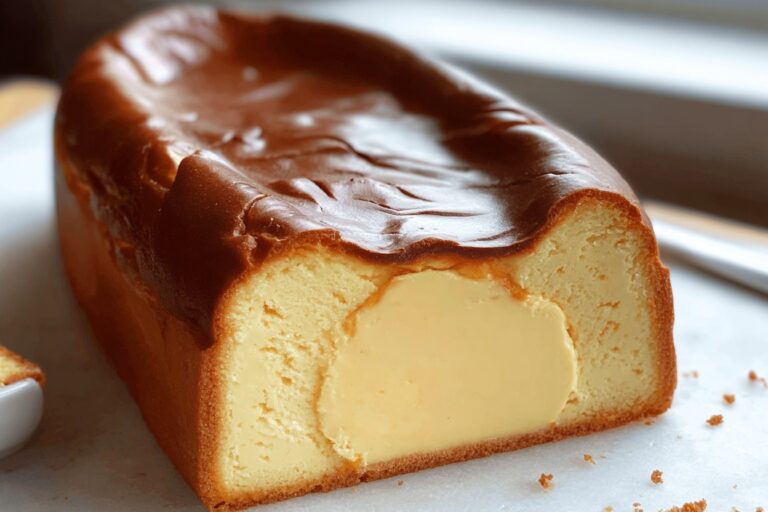
6-Sixth Step: Pour and bake. Pour the batter into the prepared loaf pan. It should settle evenly across the pan on its own. Slide it into the preheated oven and bake for 40 to 45 minutes. The cheesecake is ready when the edges are dark brown and the center is slightly lighter but still a little jiggly. That contrast is what gives burnt Basque cheesecake its signature look. Do not worry if the top looks very dark. The surface should caramelize, and that deep color is part of the flavor. The inside will remain creamy even when the top looks bold and almost burned.
7-Final Step: Cool, chill, and serve. Remove the cheesecake from the oven and let it cool fully at room temperature. This step is important because the cheesecake continues to set as it cools. Once it reaches room temperature, move it to the refrigerator and chill for 2 to 4 hours, or overnight if you have the time. Chilling makes slicing much cleaner and gives the flavor time to settle. When serving, lift the cheesecake from the loaf pan using the parchment paper, slice it with a clean knife, and serve it cold for the best texture. If you want a softer bite, let each slice sit out for a few minutes before eating.
Last Step:
Please leave a rating and comment letting us know how you liked this recipe! This helps our business to thrive and continue providing free, high-quality recipes for you.Notes
🧈 Butter pan lightly before parchment to prevent slipping during baking.
🔥 Embrace the dark, burnt top—it’s the signature scorched crust with creamy interior.
❄️ Chill overnight for best texture; cracks are rustic charm, not a flaw.
- Prep Time: 15 minutes
- Chill: 4 hours
- Cook Time: 45 minutes
- Category: Dessert
- Method: Bake
- Cuisine: Basque/Spanish
- Diet: Vegetarian
Nutrition
- Serving Size: 1 slice
- Calories: 208 kcal
- Sugar: 18g
- Sodium: 78mg
- Fat: 13g
- Saturated Fat: 8g
- Unsaturated Fat: 5g
- Trans Fat: 0g
- Carbohydrates: 20g
- Fiber: 0g
- Protein: 3g
- Cholesterol: 92mg