
Why You’ll Love This Crispy Shrimp Tempura
If you have been craving Crispy Shrimp Tempura that turns out light, crunchy, and golden every single time, this recipe is going to be a keeper. It is quick enough for a weeknight, but still special enough for dinner guests, game day snacking, or a cozy homemade Japanese-inspired meal. With a short prep time and fast frying, you can get a restaurant-style dish on the table without a lot of fuss.
- Fast and simple: This Crispy Shrimp Tempura recipe takes about 20 minutes to prep and 15 minutes to cook, so it works well for busy parents, students, and working professionals who want something impressive without spending all evening in the kitchen.
- Light yet satisfying: The tempura batter uses flour, cornstarch, egg, and ice cold water for a crisp bite that feels airy instead of heavy. That makes it a better fit for readers who like balanced meals and lighter fried food.
- Very versatile: You can serve Crispy Shrimp Tempura as an appetizer, over rice, with noodles, or alongside vegetables. It also adapts well to different sauces and side dishes, which is great for party hosts and families with mixed tastes.
- Bold texture and flavor: The shrimp stays tender inside while the outside gets crunchy and golden. A few shallow slits and a quick fry help the shrimp stay straight and look beautiful on the plate.
Great tempura is all about cold batter, dry shrimp, and hot oil. Once you get those three things right, the results get much easier.
For readers who love learning the why behind a recipe, shrimp also brings a good amount of protein and fits nicely into a range of meal styles. If you want to read more about shrimp nutrition, this WebMD guide to shrimp health benefits is a helpful place to start.
Jump to:
- Why You’ll Love This Crispy Shrimp Tempura
- Essential Ingredients for Crispy Shrimp Tempura
- Main Ingredients
- Special Dietary Options
- How to Prepare the Perfect Crispy Shrimp Tempura: Step-by-Step Guide
- First Step: Prep the shrimp
- Second Step: Set up the batter
- Third Step: Heat the oil
- Fourth Step: Dredge and dip
- Fifth Step: Fry in batches
- Final Step: Drain and serve
- Dietary Substitutions to Customize Your Crispy Shrimp Tempura
- Protein and Main Component Alternatives
- Vegetable, Sauce, and Seasoning Modifications
- Mastering Crispy Shrimp Tempura: Advanced Tips and Variations
- Pro cooking techniques
- Flavor variations
- Presentation tips
- Make-ahead options
- How to Store Crispy Shrimp Tempura: Best Practices
- FAQs: Frequently Asked Questions About Crispy Shrimp Tempura
- What kind of shrimp works best for crispy shrimp tempura?
- What size shrimp is best for shrimp tempura?
- How do I prepare shrimp for tempura to keep it crispy?
- What’s the secret to crispy tempura batter for shrimp?
- How do I fry shrimp tempura without it getting soggy?
- Crispy Shrimp Tempura
- Ingredients
- Instructions
- Last Step:
- Notes
- Nutrition
- Did you make this recipe?
Essential Ingredients for Crispy Shrimp Tempura
To make great Crispy Shrimp Tempura, you only need a few simple ingredients, but each one matters. The shrimp should be fresh or fully thawed, the batter should stay cold, and the flour choice should stay light. Cake flour works especially well because it has less protein than all-purpose flour, which helps keep the coating delicate.
Main Ingredients
- 20 to 25 shrimp, peeled with tail-on and deveined – These are the star of the dish. Tail-on shrimp are easier to hold and look more elegant when served.
- Flour for dredging – A light dusting helps the batter stick to the shrimp and supports that crisp outer layer.
- 1 cup all-purpose flour or cake flour – This forms the base of the tempura batter. Cake flour gives the lightest texture.
- 1/4 cup cornstarch – Cornstarch adds tenderness and helps the coating fry up crisp.
- 1 egg – The egg binds the batter together and gives it just enough structure.
- 1.25 cups ice cold water – Cold water keeps the batter from developing too much gluten and helps create a lighter crust.
- Oil for frying – Use a neutral oil with a high smoke point for the best results.
- Salt, optional – A small amount can be added to the batter if you want a little extra flavor.
Special Dietary Options
- Vegan: Swap the shrimp for thinly sliced zucchini, sweet potato, mushrooms, or green beans, and replace the egg with a plant-based tempura batter binder if needed.
- Gluten-free: Use a gluten-free flour blend and a gluten-free starch such as rice flour or extra cornstarch in place of wheat flour.
- Low-calorie: Fry in small batches and drain well on a wire rack. You can also serve smaller portions with vegetables to keep the plate lighter.
| Ingredient | Role in the Recipe | Why It Matters |
|---|---|---|
| Cake flour | Batter base | Helps create a lighter crust |
| Cornstarch | Texture booster | Makes the coating crispier |
| Ice cold water | Batter liquid | Limits gluten and keeps batter airy |
| Tail-on shrimp | Main protein | Easy to handle and pretty on the plate |
If you are planning a full meal around this dish, you might also like serving it after a sweet treat such as lemon blueberry bundt cake or alongside a simple dessert like mini chocolate cakes for a fun dinner party spread.
How to Prepare the Perfect Crispy Shrimp Tempura: Step-by-Step Guide
First Step: Prep the shrimp
Start by peeling the shrimp, leaving the tails on, and deveining them if that has not already been done. Rinse the shrimp briefly under cold water, then pat them completely dry with paper towels. This step matters because extra moisture can cause the batter to slide off and can also make the oil splatter more than it should.
Next, make 4 to 6 shallow slits on the underside of each shrimp. These little cuts help the shrimp stay straight while frying instead of curling up tightly. After that, press gently on the back of each shrimp to help break the muscle and flatten it a bit. That simple trick makes the finished Crispy Shrimp Tempura look more like the kind you get at a good Japanese restaurant.
Second Step: Set up the batter
In a bowl, whisk together 1 egg and 1.25 cups of ice cold water. Then add 1 cup of all-purpose flour or cake flour plus 1/4 cup cornstarch. Stir gently until just combined. A few lumps are fine, and honestly, they are better than overmixing. If you mix too much, the gluten in the flour starts to work harder and the batter can turn heavy and chewy instead of crisp.
If you want a little extra seasoning, add a pinch of salt to the batter. Some cooks like to keep the bowl in a larger bowl of ice to hold the temperature low while they work. That colder batter is one of the biggest secrets behind great tempura texture.
Do not try to whisk the batter smooth. Tempura batter is supposed to look a little rough, and that roughness helps create a delicate, craggy crust.
Third Step: Heat the oil
Pour enough neutral oil into a deep pan or pot for frying and heat it to 375°F. A thermometer is really helpful here, because tempura can go wrong fast if the oil is too cool or too hot. If the oil is too cool, the coating absorbs more oil and gets greasy. If it is too hot, the outside browns before the shrimp cooks through.
While the oil heats, get a tray ready with flour for dredging, the batter bowl, and a wire rack or paper towels for draining. This setup keeps the process smooth, which is especially useful if you are cooking for a crowd or trying to move fast on a busy night.
Fourth Step: Dredge and dip
Lightly dust each shrimp in flour before dipping it into the batter. The thin flour coating helps the batter cling to the shrimp and gives you a more even finish. Shake off the extra flour so the final crust stays light. Then dip the shrimp into the tempura batter and let any excess drip off for just a second or two.
Do not leave the shrimp sitting in the batter for long. Once the coating is on, the shrimp should go right into the oil so the texture stays airy. This is one of those little timing details that makes a big difference in Crispy Shrimp Tempura.
Fifth Step: Fry in batches
Carefully place the battered shrimp into the hot oil in small batches. Fry them for about 2 minutes, or until they turn pale golden and crisp. As they fry, drizzle a little extra batter over some of the shrimp if you want that lacy tempura texture on the outside. That trick gives the finished dish a more rustic, restaurant-style look.
Do not overcrowd the pot. Too many shrimp at once will drop the oil temperature and make the coating soggy. Between batches, skim out loose batter bits so the oil stays cleaner and the next batch browns evenly.
Final Step: Drain and serve
Use a spider, slotted spoon, or tongs to lift the shrimp out of the oil. Let them drain on a wire rack so the underside stays crisp. If you only have paper towels, use them lightly, but a rack is better because it prevents trapped steam. Serve immediately while the tempura is at its crunchiest.
For dipping, you can keep things simple with your favorite sauce or serve the shrimp as part of a larger meal. Whether you are feeding guests or making a quick family dinner, this Crispy Shrimp Tempura comes together beautifully when you respect the batter, the oil, and the timing.

Dietary Substitutions to Customize Your Crispy Shrimp Tempura
Protein and Main Component Alternatives
If shrimp is not the right fit for your table, you can still use the same tempura method with other foods. Firm fish like cod or halibut can work, but slice them into smaller pieces so they cook evenly. Scallops are another tasty option if you want something tender and a little sweet.
For a plant-based version, try asparagus, zucchini, mushrooms, sweet potato, broccoli florets, or onion rings. These vegetables fry well and hold the light batter nicely. Keep the pieces similar in size so they cook at the same pace. If you are cooking for a mixed group, making both shrimp and vegetables is a smart way to please everyone at once.
Vegetable, Sauce, and Seasoning Modifications
You can also change the flavor by adjusting the dipping sauce or adding seasonings to the flour. A little salt in the batter is a simple way to boost flavor. For a bolder version, add a pinch of white pepper or garlic powder, though traditional tempura usually stays very mild.
For dipping, classic tempura sauce works well, but you can also serve it with soy sauce, citrus dipping sauce, or even a spicy mayo if you want a more modern feel. If you like meal planning, this recipe also fits well beside rice bowls, noodle dishes, and simple vegetable sides. That makes Crispy Shrimp Tempura a handy option for weeknights, lunch boxes, and casual entertaining.
Mastering Crispy Shrimp Tempura: Advanced Tips and Variations
Pro cooking techniques
One of the best tips is to keep everything cold except the oil. Chill the batter bowl over ice if your kitchen is warm. Use shrimp that are thoroughly dry before frying, because hidden moisture can create splatter and weaken the crust. If your oil gets cloudy from tiny batter crumbs, scoop them out between batches so the next shrimp fry cleanly.
Another useful trick is to fry only a few shrimp at a time. Small batches help keep the oil temperature steady, which is a big part of getting that crisp, delicate bite. If your shrimp are very large, add 10 to 15 seconds to the fry time. For medium to large shrimp, about 2 minutes is usually perfect.
Flavor variations
You can keep the batter plain and let the shrimp shine, or you can add a small pinch of salt for a more seasoned crust. Some home cooks like to dust the shrimp with a little extra cornstarch before the flour step for even more crunch. If you want a slightly richer flavor, serve the tempura with a soy-based dipping sauce and a squeeze of lemon.
For a mixed plate, try adding sweet potato fries, onion rings, or green beans using the same batter. That gives your meal more variety without changing the method. It is also a great option when you want to stretch one recipe into a fuller dinner for the family.
Presentation tips
Arrange the shrimp on a plate with the tails facing up so they look neat and easy to grab. Add a small bowl of dipping sauce on the side. A few thinly sliced green onions or a wedge of lemon can give the plate a fresh finish. If you are serving guests, line the shrimp on a simple platter instead of piling them high, since that helps keep the coating crisp.
Make-ahead options
You can prep the shrimp earlier in the day by cleaning, drying, and slitting them, then storing them covered in the refrigerator until you are ready to batter and fry. The batter itself should be made right before cooking, because it loses its airy texture as it sits. If you are hosting a party, do all your prep ahead and fry just before serving so the Crispy Shrimp Tempura stays hot and crunchy.
If you are in the mood for a sweet finish after a savory meal, you might enjoy something simple like lemon cream pie for a bright, refreshing dessert course.
How to Store Crispy Shrimp Tempura: Best Practices
Tempura tastes best fresh, but you can still store leftovers if needed. The key is to keep moisture away so the coating does not turn soft. A wire rack, airtight container, and proper reheating method make a big difference.
- Refrigeration: Store cooled shrimp tempura in an airtight container lined with paper towels for up to 2 days. Keep the pieces in a single layer if possible.
- Freezing: Freeze cooked shrimp tempura in a single layer on a baking sheet first, then transfer to a freezer-safe bag or container. This helps prevent sticking. Best quality is usually within 1 month.
- Reheating: Reheat in an oven or air fryer at 375°F until crisp and hot. Avoid the microwave because it softens the coating quickly.
- Meal prep: Prepare the shrimp ahead of time and keep the batter ingredients separate until cooking day. Tempura batter works best when mixed fresh.
If you want to serve leftovers in a different way, tuck them into a rice bowl with veggies or pair them with a quick salad. That can make Crispy Shrimp Tempura feel fresh again the next day.
FAQs: Frequently Asked Questions About Crispy Shrimp Tempura
What kind of shrimp works best for crispy shrimp tempura?
Fresh or frozen uncooked shrimp are ideal for crispy shrimp tempura—avoid precooked cocktail shrimp as they won’t crisp up properly. Opt for deveined shrimp with shells removed but tails on for easy handling and presentation. Frozen bags from stores like Costco work great; just thaw them in cold water first. Medium to large sizes hold up best during frying, preventing the batter from overwhelming the shrimp. Pat them dry thoroughly before battering to ensure maximum crispiness. This prep keeps the texture tender inside with a shatteringly crisp exterior. (78 words)
What size shrimp is best for shrimp tempura?
Go for 21/25 count shrimp (21-25 per pound) for the perfect balance in shrimp tempura—they’re large enough for a good bite but not so big they turn tough. Smaller shrimp (like 71/90) make the batter-to-shrimp ratio uneven, leading to sogginess, while colossal (16/20) can be chewy. Shrimp size is based on count per pound: lower numbers mean bigger shrimp. Adjust frying time slightly for size variations—larger ones need 10-15 seconds more. This size delivers succulent, tender results every time. (92 words)
How do I prepare shrimp for tempura to keep it crispy?
Start by deveining and peeling shrimp, leaving the tail on. Make a few shallow cuts along the belly to prevent curling, then straighten them under light pressure or skewer briefly. Pat completely dry with paper towels—moisture is the enemy of crispiness. Lightly dust with cornstarch before battering to help it adhere. Chill shrimp in the fridge for 15 minutes pre-fry. This method ensures even cooking, straight shape, and ultra-crispy results without oil splatter. Fry immediately after battering for best texture. (89 words)
What’s the secret to crispy tempura batter for shrimp?
Use a light batter of 1 cup cake flour, 1 egg yolk, 1 cup ice-cold sparkling water, and a pinch of baking powder—no overmixing for airy crispiness. Keep it fridge-cold (around 40°F) to create steam pockets during frying. Rice flour adds extra crunch if desired. Dip chilled, dry shrimp quickly and fry at 340-350°F in neutral oil like canola. Double-fry for ultimate crisp: first at 340°F for 2 minutes, rest, then 375°F for 30 seconds. Drain on a wire rack, not paper. (96 words)
How do I fry shrimp tempura without it getting soggy?
Heat oil to 340-350°F and fry in small batches (3-4 shrimp) to maintain temperature—crowding drops heat and steams them soggy. Fry straight shrimp 2-3 minutes until golden, flipping once. Remove with a slotted spoon to a wire rack over a baking sheet to drain excess oil. Avoid paper towels, which trap steam. For extra crisp, double-fry: initial fry at lower temp, cool 5 minutes, then high-heat blast. Serve immediately with tentsuyu dipping sauce. Test oil with batter bits—they should sizzle and rise fast. (94 words)
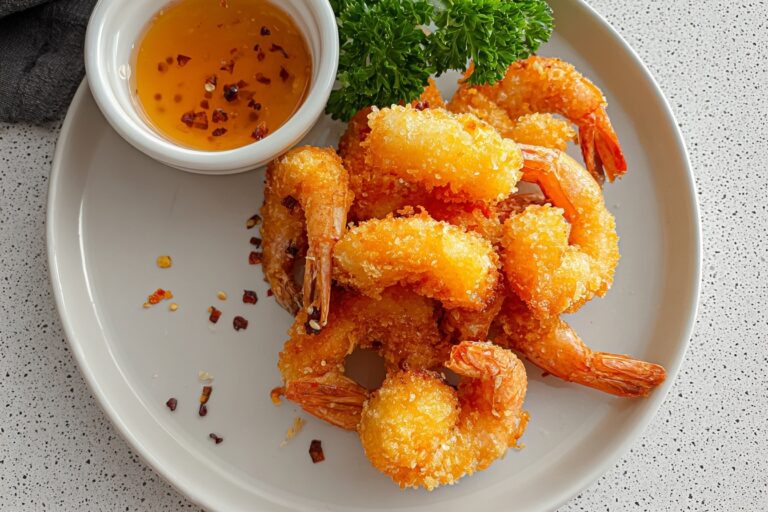
Crispy Shrimp Tempura
🦐 Dive into ultra-crispy, light-as-air shrimp tempura that’s golden and shatteringly crunchy on the outside, tender inside – authentic Japanese delight!
🍤 Quick to make at home, perfect appetizer for sushi nights or parties, impressing with minimal effort and maximum flavor.
- Total Time: 35 minutes
- Yield: 4 servings
Ingredients
– 20 to 25 shrimp, peeled with tail-on and deveined
– Flour for dredging
– 1 cup all-purpose flour or cake flour
– 1/4 cup cornstarch
– 1 egg
– 1.25 cups ice cold water
– Oil for frying
– Salt, optional
Instructions
1-First Step: Prep the shrimp Start by peeling the shrimp, leaving the tails on, and deveining them if that has not already been done. Rinse the shrimp briefly under cold water, then pat them completely dry with paper towels. This step matters because extra moisture can cause the batter to slide off and can also make the oil splatter more than it should. Next, make 4 to 6 shallow slits on the underside of each shrimp. These little cuts help the shrimp stay straight while frying instead of curling up tightly. After that, press gently on the back of each shrimp to help break the muscle and flatten it a bit. That simple trick makes the finished Crispy Shrimp Tempura look more like the kind you get at a good Japanese restaurant.
2-Second Step: Set up the batter In a bowl, whisk together 1 egg and 1.25 cups of ice cold water. Then add 1 cup of all-purpose flour or cake flour plus 1/4 cup cornstarch. Stir gently until just combined. A few lumps are fine, and honestly, they are better than overmixing. If you mix too much, the gluten in the flour starts to work harder and the batter can turn heavy and chewy instead of crisp. If you want a little extra seasoning, add a pinch of salt to the batter. Some cooks like to keep the bowl in a larger bowl of ice to hold the temperature low while they work. That colder batter is one of the biggest secrets behind great tempura texture. Do not try to whisk the batter smooth. Tempura batter is supposed to look a little rough, and that roughness helps create a delicate, craggy crust.
3-Third Step: Heat the oil Pour enough neutral oil into a deep pan or pot for frying and heat it to 375°F. A thermometer is really helpful here, because tempura can go wrong fast if the oil is too cool or too hot. If the oil is too cool, the coating absorbs more oil and gets greasy. If it is too hot, the outside browns before the shrimp cooks through. While the oil heats, get a tray ready with flour for dredging, the batter bowl, and a wire rack or paper towels for draining. This setup keeps the process smooth, which is especially useful if you are cooking for a crowd or trying to move fast on a busy night.
4-Fourth Step: Dredge and dip Lightly dust each shrimp in flour before dipping it into the batter. The thin flour coating helps the batter cling to the shrimp and gives you a more even finish. Shake off the extra flour so the final crust stays light. Then dip the shrimp into the tempura batter and let any excess drip off for just a second or two. Do not leave the shrimp sitting in the batter for long. Once the coating is on, the shrimp should go right into the oil so the texture stays airy. This is one of those little timing details that makes a big difference in Crispy Shrimp Tempura.
5-Fifth Step: Fry in batches Carefully place the battered shrimp into the hot oil in small batches. Fry them for about 2 minutes, or until they turn pale golden and crisp. As they fry, drizzle a little extra batter over some of the shrimp if you want that lacy tempura texture on the outside. That trick gives the finished dish a more rustic, restaurant-style look. Do not overcrowd the pot. Too many shrimp at once will drop the oil temperature and make the coating soggy. Between batches, skim out loose batter bits so the oil stays cleaner and the next batch browns evenly.
6-Final Step: Drain and serve Use a spider, slotted spoon, or tongs to lift the shrimp out of the oil. Let them drain on a wire rack so the underside stays crisp. If you only have paper towels, use them lightly, but a rack is better because it prevents trapped steam. Serve immediately while the tempura is at its crunchiest. For dipping, you can keep things simple with your favorite sauce or serve the shrimp as part of a larger meal. Whether you are feeding guests or making a quick family dinner, this Crispy Shrimp Tempura comes together beautifully when you respect the batter, the oil, and the timing.
Last Step:
Please leave a rating and comment letting us know how you liked this recipe! This helps our business to thrive and continue providing free, high-quality recipes for you.Notes
❄️ Use ice-cold water and keep batter in an ice bath for the lightest, crispiest results.
🥄 Avoid overmixing the batter to prevent gluten development and tough texture.
🦐 Ensure shrimp are thoroughly dry before dredging for better batter adhesion.
- Prep Time: 20 minutes
- Cook Time: 15 minutes
- Category: Appetizer
- Method: Deep Fry
- Cuisine: Japanese
- Diet: Pescatarian
Nutrition
- Serving Size: 5-6 shrimp
- Calories: 350 kcal
- Sugar: 0g
- Sodium: 450mg
- Fat: 20g
- Saturated Fat: 2g
- Unsaturated Fat: 17g
- Trans Fat: 0g
- Carbohydrates: 28g
- Fiber: 1g
- Protein: 15g
- Cholesterol: 120mg